
For many people, learning is a real chore best avoided. The “chore” of learning comes with a lot of deep thinking, no play, and very little understanding of why the lesson needs to be learned in the first place. No fun.
Learning was different back in the 1990s when a very popular children’s TV show called Beakman’s World presented a way to make learning fun. The show’s engaging host, Paul Zaloom, played Beakman, a mad scientist who had fun with science. Lots of fun. Using humor and everyday items, he taught science in a way that captured the attention of kids and their parents, too. Beakman exposed the science behind common things in a hands-on way that made science interesting and easy to understand.
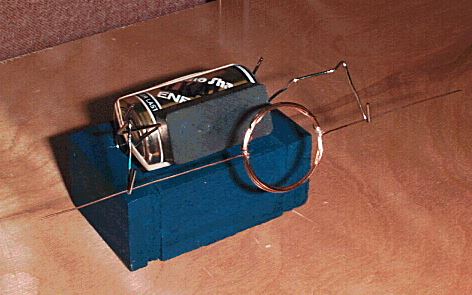
One of his most popular segments featured Beakman’s Electric Motor, made from an empty roll of toilet paper, a couple of paper clips, a rubber band or two, and a few other easy-to-find items.
Here’s How He Did It
Gather all these materials before going any further:
- Medium gauge magnet wire insulated with red enamel (not the plastic-coated kind)
- One cardboard tube from a roll of toilet paper
- Scissors or wire cutter
- Fine-grain sandpaper
- Two large paper clips
- One wide rubber band
- One “D” cell alkaline battery
- One rectangular ceramic magnet smaller than the battery
Optional items that might make assembly a bit easier:
- Glue
- Needle-nose pliers
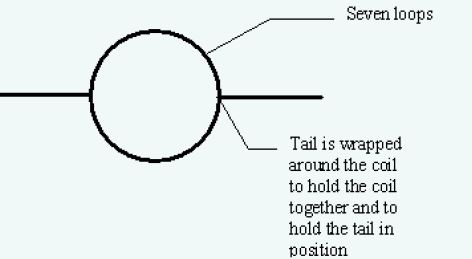
Step #1
Wrap the wire around the toilet paper tube seven times and cut off excess wire, leaving a tail about 3 inches long on both sides of the coil. Use a drop of glue at the outward bend of the tail to minimize slipping. Remove the toilet paper tube. Your coils should look a bit like Saturn from the side, with its ring visible on the left and right of the planet (coil) in the middle.
Step #2
Use the sandpaper to remove all the insulation around one of the tails of the coil except for the outer 1/4 inch of the tip of the tail. Leave all the insulation on this outer 1/4 inch of the tip.
Step #3
Lay the other wire tail on a solid surface and use the sandpaper to remove the insulation from only the top side of the coil. Leave the insulation at the outer 1/4 inch tip of the tail in place, just like you did with the other tip. Do not remove the insulation from the under side of this tail. Set the coil aside until Step #8.
Step #4
Bend the paper clips open so they look a bit like a long, curly mustache. Pliers may help here.
Step #5
Loop the longer “curl” of the paper clip mustache around the terminal at one end of the battery. Use the rubber band to secure it by looping it from one end of the battery to the other. You may need to make a couple of rubber band loops to create a secure fit.
Step #6
Slide the longer curl of the other paper clip around the terminal at the other end of the battery. Slide it under the rubber band to secure it and align it with the other paper clip.
Step #7
Stick the magnet to the battery between the two paper clip curls.
Step #8
Cradle the tail of one end of the wire coil in the smaller curl of the paper clip mustache at one end of the battery. Cradle the other tail in the small curl at the other end. The magnet will be between the battery and the coil. Place your Beakman’s electric motor horizontally on a solid surface.
Step #9
Give the wire coil a little push to get it started and the watch it spin rapidly.
Step #10
Remove the coil to turn the motor off.
If the coil produces a lop-sided spin, make sure the tails of the coil
are centered exactly opposite each other on either side of the coil.
If the coil doesn’t spin after a gentle push, there may still be
insulation left on the wire. Sand it down a bit more thoroughly and try
again.
Check out Intella Parts selection of quality electric motors for forklifts here
Electric Forklift Motor
There’s one fundamental principle that applies to all electric motors: magnetism; like poles repel one another and opposite poles attract. Put into simple terms, motors are devices that convert electrochemical energy into mechanical energy. This concept is just as true for material handling equipment such as electric forklifts as it is for any other vehicle that operates on an electric motor (such as electric cars). A forklift motor (along with the forklift battery) has the job of powering the forklift. Therefore, when the forklift moves forward or backward that’s evidence that the motor is doing its job.
How Magnetism works
Magnetism is the core principle behind the operation of electric motors. Imagine that a magnet has been connected to a shaft to rotate in a north and south direction. Introducing another magnet to the mix will either push the shaft towards the new magnet (opposite poles) or away from the magnet (like poles). This is how an electric motor works. Electric motors, however, harness the power of a magnetic field produced by electrical currents in industrial batteries. A magnetic field is created when a wire is wrapped around iron, and its behavior begins to resemble that of an average magnet. Electric motors are designed in this manner.
Motor Operation
- Field coil/stator – plays the role of the magnet. Any current that runs through this wire flows in a single direction which determines that the field coil has fixed north and south poles. This part also has the ability to repel opposite poles.
- Commutator/armature – this is the shaft-mounted magnet. When current is introduced to the wire, a magnetic field is formed, just like the field coil. This piece can rotate, and thus will spin to match the unlike poles of the field coil.
- Brushes – brushes perform an opposite action to that of turning the magnet on the shaft.
The combinations of all of these processes generate mechanical energy AKA revolutions per minute (RPM). Forklifts do not have a drive shaft or transmission. The drive axle has a direct connection to the motor. Ultimately, forklifts operate differently in the sense that the grooved (or splined) end of the armature operates the gear in the axle. Thus all power and speed is derived from the accelerator circuit of the electrical system.
Battery power then comes into play. Depending on the motor, they can house either 36- or 48-volt batteries. Both work fine, the power of the 48 volt will come in handy if you need more power, speed, and longer battery life.
Solid State Controls for Operating an Electric Forklift Motor
Though powerful in their own right, electric forklift motors are just a single part of a more extensive electrical system that’s controlled by a Silicon Controlled Rectifier (SCR Control) AKA Transistor Control. SCR control governs every aspect of an electric forklift. These include:
- Controls how much current is transferred from the battery to the drive motors via the accelerator circuits.
- Optional controls are available for controlling auxiliary operations, lift, tilt, and power steering.
With today’s advanced technology, most solid state controls can display an error to the operator when the system detects that something is wrong. Furthermore, the programming can even be customized to change the performance of the forklift, giving the user greater flexibility in tailoring their forklift to their specific performance needs.
What we can learn from the Beakman Electric Motor
You can say that the Beakman Electric Motor revealed the simple concept of how an electric motor works. This concept helps us to understand how vehicles, such as forklift trucks, are powered by electric motors. It’s all quite simple at the end of the day and gaining a deeper understanding of how it works will continue to push as to learn more about how things work.